When Halloween rolls around, we often think of costumes, makeup, and decorations — but your nails can be just as spooky and expressive as your outfit! Halloween nail art doesn’t have to be complicated or salon-level to look amazing. With just a few tools and some creativity, even beginners can craft creepy, cute, and totally Instagram-worthy nail looks.
Whether you’re going for elegant gothic vibes, cute pumpkin patterns, or gory ghostly glamour, these 7 spooky Halloween nail art ideas for beginners will help you get in the spirit without needing professional experience. Let’s grab those brushes and polish bottles and dive into some easy, eerie fun!
1. Pumpkin Patch Nails – The Classic Halloween Favorite
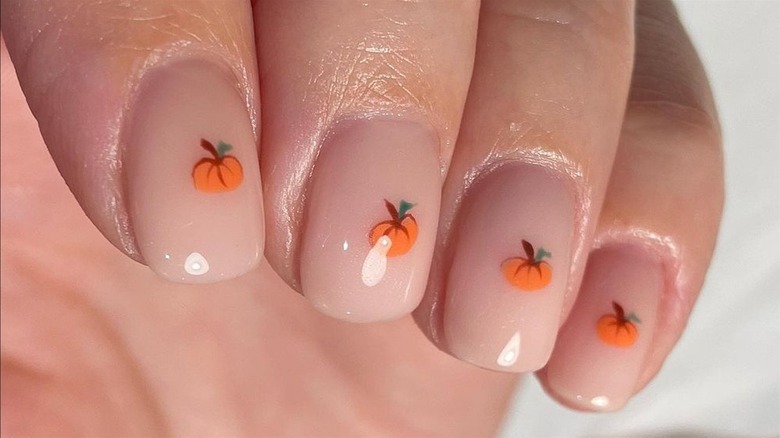
Pumpkins are the ultimate Halloween icon, and this nail design captures their warm, festive energy perfectly. The best part? It’s super easy to do — all you need are a few basic colors and a steady hand.
What You’ll Need:
- Orange nail polish (for the pumpkins)
- Green polish (for stems)
- Black or dark brown polish (for outlining)
- Thin nail art brush or toothpick
How to Do It:
- Start with a nude or orange base coat.
- Once dry, paint small round orange shapes on each nail — these will be your pumpkins.
- Add thin green lines on top for stems.
- For extra detail, outline the pumpkins with a thin brush dipped in black polish.
- Finish with a glossy top coat for shine.
Pro Tip: Add tiny black jack-o’-lantern faces on one or two nails for a cute twist!
Perfect for: Beginners who love traditional Halloween vibes with a touch of cozy charm.

2. Ghostly White Tips – A Spooky French Manicure
If you love minimalism but still want something spooky, ghost-themed nails are perfect. They’re chic, easy, and have that classic “boo!” factor without being over the top.
What You’ll Need:
- White nail polish
- Black polish or nail pen for details
- Clear base coat
How to Do It:
- Paint your nails with a sheer nude or clear base.
- Using white polish, create curved “ghost” shapes at the tips (like a French manicure, but with wavy edges).
- Once dry, use a nail pen or thin brush to draw two black dots for eyes and a small “O” for a mouth.
- Seal with a glossy top coat.
Pro Tip: For variation, make a few ghosts “flying” diagonally or add small sparkles around them.
Perfect for: Those who want subtle Halloween nails that work for office or everyday wear.
3. Spider Web Nails – Creepy Yet Chic

Spider webs are an elegant way to make your nails look spooky and sophisticated at the same time. The design looks intricate, but with a little practice, it’s beginner-friendly.
What You’ll Need:

- Black or dark gray nail polish (base color)
- White or silver nail polish for the web
- Thin detailing brush or toothpick
How to Do It:
- Paint all your nails with a deep black or midnight blue polish.
- Using your thin brush, draw a few straight lines radiating from one corner of the nail — like a sunburst.
- Connect these lines with curved arcs to form a web pattern.
- Let it dry and finish with a glossy or matte top coat.
Pro Tip: Add a small rhinestone or dot of red polish in one corner to create a “spider.”
Perfect for: Anyone who wants a mix of dark glamour and gothic Halloween style.
4. Skeleton Bones – Minimal Yet Edgy
Skeleton nails are another Halloween staple that’s surprisingly easy to do at home. You can make them as simple or as detailed as you want, and they look incredible under UV light at parties.
What You’ll Need:
- Black polish (base)
- White polish (for bones)
- Fine nail brush or nail pen
How to Do It:
- Paint your nails black and let them dry completely.
- Using the white polish, draw small bone patterns — think long rectangles for arm bones or tiny circles for skulls.
- If you want, draw one big skull on your thumbnail for an accent design.
- Seal with a matte top coat for a haunted, dusty effect.
Pro Tip: Don’t worry about symmetry! The slightly imperfect look adds to the eerie skeleton aesthetic.

Perfect for: Anyone who loves dark, punk-inspired Halloween looks.
5. Blood Drip Nails – Simple and Dramatic
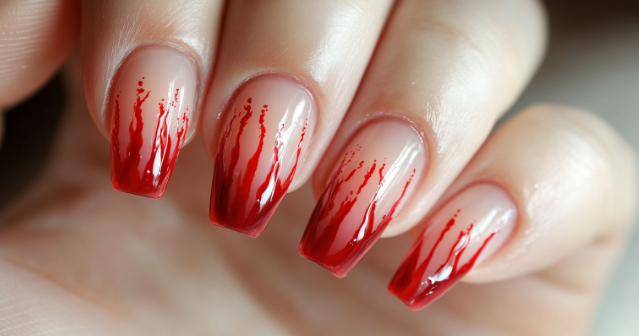
If you’re after something bold and chilling, this blood drip effect will make your nails look straight out of a vampire’s dream. Despite how intricate it appears, it’s super easy to achieve with just two colors.
What You’ll Need:
- Nude, black, or white base color
- Red nail polish
- Dotting tool or bobby pin
How to Do It:
- Paint your nails with the base color of your choice.
- Once dry, use a dotting tool to create a few red dots near the cuticle.
- Drag each dot down with a thin brush to create drip lines.
- Fill in the top of the nail near the cuticle to make it look like a pool of blood.
- Finish with a glossy top coat to give it a wet, realistic effect.
Pro Tip: Try using metallic red or dark crimson polish for a more intense, 3D appearance.
Perfect for: Vampire lovers, horror movie fans, or anyone who wants bold, dramatic nails for Halloween night.
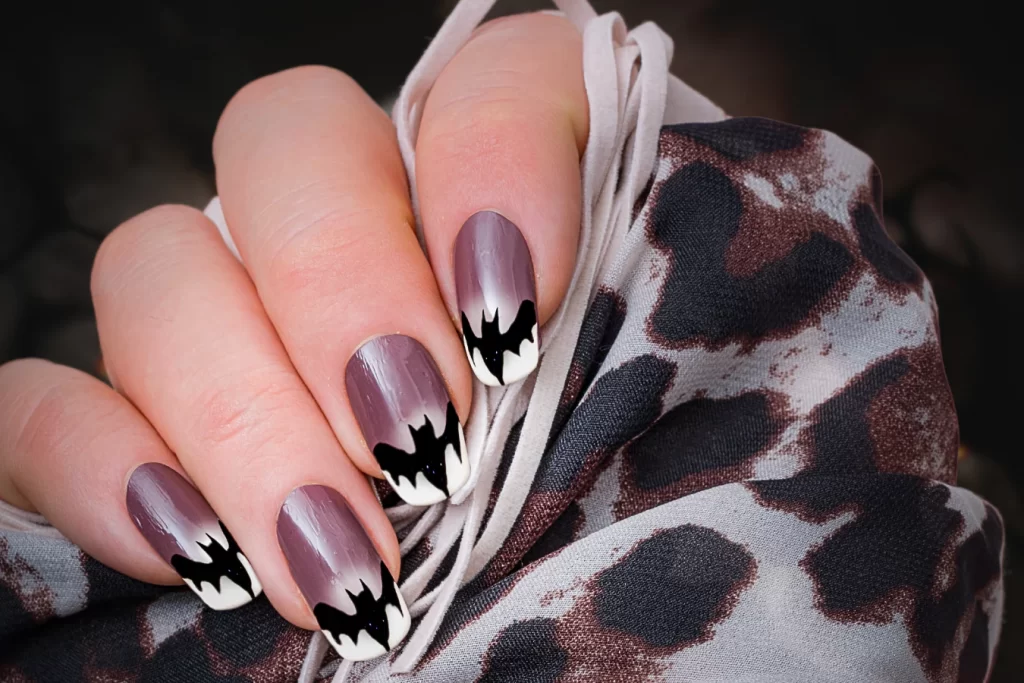
6. Bat Silhouette Nails – Cute Yet Creepy
Bats are another Halloween favorite — they’re adorable and eerie all at once. Bat designs are surprisingly beginner-friendly, especially if you use stencils or stickers.

What You’ll Need:
- Deep purple or midnight blue base polish
- Black polish or bat stickers
- Thin nail brush or nail art pen
How to Do It:
- Paint your nails with a dark base color like navy, purple, or charcoal.
- Using your brush or stickers, create small bat shapes flying across your nails.
- For a sky effect, add tiny white dots for stars.
- Finish with a glossy top coat for depth and shine.
Pro Tip: If hand-drawing is tricky, use a small stamping plate or pre-cut nail decals for perfect shapes.
Perfect for: Those who want fun, spooky nails that are quick and mess-free.
7. Glittery Graveyard Nails – Sparkly with a Touch of Terror
If you love glam with your gore, glittery graveyard nails are your go-to. They mix spooky silhouettes with shimmering finishes — perfect for Halloween parties where you want your nails to shine under the lights.
What You’ll Need:
- Dark gray or black base polish
- Silver or holographic glitter polish
- White polish or nail art pen
- Thin brush
How to Do It:

- Paint your nails black and let them dry.
- On the bottom half of each nail, apply silver glitter polish for a subtle sparkle.
- Using white polish, draw small tombstones, crosses, or moon silhouettes.
- Optionally, add faint misty clouds or ghosts for detail.
- Seal with a top coat for extra shine and durability.
Pro Tip: Add glow-in-the-dark top coat for a supernatural nighttime effect.
Perfect for: Party-goers who love mixing eerie designs with glamorous finishes.
Bonus Tips for Halloween Nail Success
Even simple designs can look amazing with the right technique and care. Here are a few extra tips to make your spooky nails look salon-worthy:
- Always prep your nails – File, buff, and apply a base coat to prevent staining and ensure a smooth finish.
- Work with thin layers – It’s easier to build up polish than fix thick, uneven coats.
- Clean up edges – Dip a small brush in nail polish remover to tidy the sides for a neat look.
- Top it off – Always finish with a top coat to seal your art and add shine.
- Be patient – Let each layer dry completely before moving to the next to avoid smudging.
Final Thoughts
Halloween nail art is one of the most fun and creative ways to express your spooky spirit. You don’t need professional tools or years of experience — just a few polishes, a steady hand, and a little imagination.
From adorable pumpkins to haunting skeletons, these 7 spooky Halloween nail art ideas for beginners prove that anyone can create bewitching nails at home. Try one design for subtle festive flair or mix and match them for a full-on Halloween manicure masterpiece!
So grab your favorite nail polishes, put on a creepy playlist, and let your creativity come alive — one spooky fingertip at a time.