Growing lemon trees at home is one of the most rewarding gardening experiences — not only because lemons are incredibly useful, but also because lemon plants grow beautifully, smell heavenly, and add a fresh, vibrant look to any space. If you’ve ever wished to grow your own lemon tree without waiting years for seedlings to mature, you’re in luck! Propagating lemon trees from cuttings is one of the fastest and most reliable methods — and with the right steps, you can achieve strong rooting in just one month.
This detailed guide will walk you through everything you need to know — from choosing the right cutting and preparing it, to rooting, potting, and caring for your young lemon plant. Whether you are a beginner or an experienced gardener, these expert-approved methods will ensure you get healthy, vigorous plants every single time.
Why Grow Lemon Trees from Cuttings?
Instead of growing from seeds — which may NOT produce true-to-type fruit — cuttings give you:
Faster Growth
Cuttings root and start growing immediately, while seeds take months to become stable saplings.
Guaranteed Fruit Quality
You’re cloning a mature, fruit-bearing tree, so you know exactly what type of lemons you’ll get.
Higher Success Rate
When done properly, cuttings root quickly and strongly — often within 20–30 days.

Cost-Effective
All you need is a branch, a simple pot, and common household items.
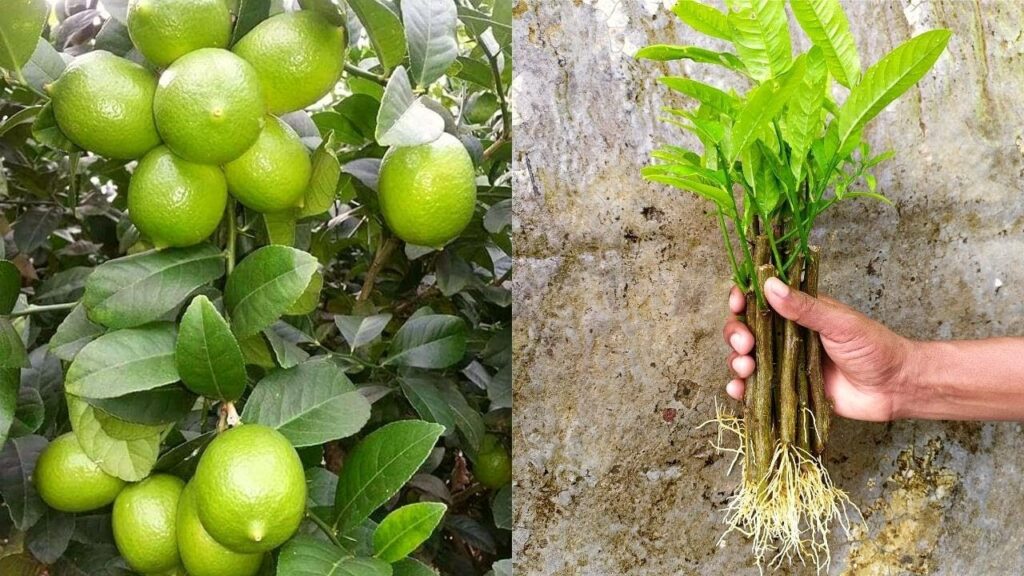
Step 1: Choose the Perfect Lemon Cutting
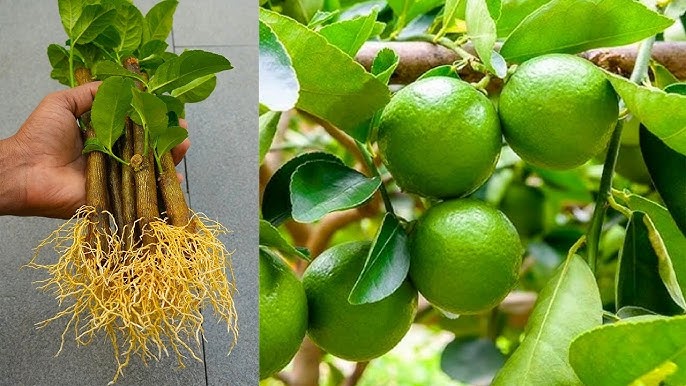
What Type of Cutting to Use
The ideal cutting should:
- Be 6–8 inches long
- Come from a healthy, disease-free lemon tree
- Have semi-hardwood growth (not too soft, not too woody)
- Have 3–5 leaves
- Be taken from a branch that fruited recently — this is a sign of maturity
Avoid very old, dry, or damaged branches.
Best Time to Take Cuttings
- Early morning
- During the growing season (spring to early winter in warm climates)
Step 2: Prepare Your Cutting for Maximum Rooting
To make your cutting root quickly, prepare it properly.
Trim the Leaves
- Remove all leaves except the top 1–2.
- Cut remaining leaves in half to reduce water loss.
Make a Clean Stem Cut
- Cut just below a node — this is the point where most rooting hormones are active.
Optional: Lightly Scratch the Bark
- Gently scrape 1 inch of bark on one side.
- This exposes the cambium layer and speeds up root development.
Apply Rooting Booster
You may use:
- Aloe vera gel
- Organic honey
- Cinnamon powder (antifungal)
- Commercial rooting hormone (fastest results)
Dip the lower 1–2 inches of the cutting into your rooting solution.

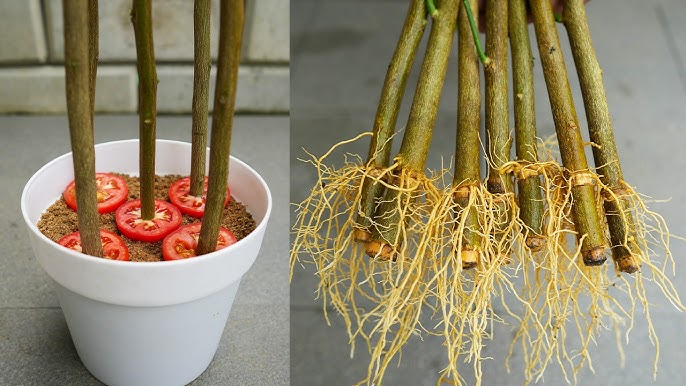
Step 3: Prepare the Best Soil Mix for Fast Rooting
Lemon cuttings root best in a light, airy, well-draining mix.
Perfect Soil Mix:
- 50% cocopeat or peat moss
- 30% perlite or coarse sand
- 20% garden soil or compost
This ensures:
- Aeration
- Moisture retention
- No fungal growth
- Strong, white root development
Sterilize for Safety
Before planting, lightly moisten the mix and microwave it for 2–3 minutes to kill any fungi.
Step 4: Plant the Lemon Cutting Correctly
- Make a deep hole using a stick or pencil.
- Insert the cutting 2–3 inches deep.
- Firm the soil around it — but do NOT press too hard.
- Water lightly.
Step 5: Create a Mini Greenhouse (This Is the Secret!)
Lemon cuttings root quickly when humidity stays above 80%.
How to Make It
- Cover the pot with a plastic bottle, transparent container, or plastic bag.
- Ensure it doesn’t touch the leaves.
- Keep a few small air holes to prevent fungus.
Why It Works
- Locks in moisture
- Prevents leaf drying
- Maintains warmth
- Speeds up rooting
This is the key reason rooting happens in just one month.
Step 6: Place the Cutting in the Right Location
Lemon cuttings need:

- Bright indirect light
- Warm temperature (22–28°C)
- No direct harsh sunlight
- Consistent moisture
Avoid placing the pot in windy or cold areas.
Step 7: Watering Schedule

Overwatering kills more cuttings than anything else.
Follow this simple rule:
- Keep the soil slightly moist — NEVER soggy.
- Water only when the top layer feels dry.
- Mist inside the greenhouse lightly if condensation disappears.
Day-by-Day Rooting Timeline (What to Expect)
Week 1
- Cutting absorbs moisture
- Leaves stay green and firm
- No visible changes — but root cells activate
Week 2
- Tiny root bumps begin forming
- Stem thickens at the base
Week 3
- Roots grow 1–2 cm
- Leaves may push new buds
Week 4
- Strong root system forms
- Cutting becomes stable and ready for transplanting
If leaves remain green throughout, your cutting is 95% successful!
Step 8: Transplanting After 1 Month
Once roots are visible or the cutting resists gentle pulling:
Use a Bigger Pot (8–12 inches)
Fill with:
- 40% garden soil
- 40% compost
- 20% sand/perlite
Transplanting Steps
- Remove cutting gently.
- Do NOT shake the soil off the roots.
- Plant at the same depth.
- Water lightly.
- Keep in shade for 3–5 days before bringing it to sunlight.
Step 9: Caring for Your New Lemon Plant
Sunlight Needs
- 4–6 hours of sunlight daily
- Avoid harsh afternoon sun for young plants
Watering
- Water every 3–4 days
- Keep soil slightly moist, not soaked
Fertilizing
Start after 6 weeks:

- Cow dung compost or vermicompost
- Banana peel fertilizer
- NPK 5-5-5 (optional)
Feed once every month.
Pruning
Trim weak branches to encourage bushy growth.
When Will Your Lemon Tree Start Fruiting?
With proper care:
- Indoor lemon trees: 2–3 years
- Outdoor lemon trees: 1.5–2 years
Your plant will grow faster because it was propagated from a mature cutting.
Final Thoughts
Growing lemon trees from cuttings is not just easy — it’s fast, reliable, and fun. With the right cutting, proper soil, high humidity, and gentle care, you can root your lemon cuttings in just one month and enjoy a beautiful, fragrant plant that will soon bear fresh, juicy lemons.
Whether you’re a gardening hobbyist or someone looking to expand your home garden, this method guarantees excellent results every time.

http://indogenericexport.com/# indianpharmacy com
Your comment is awaiting moderation.